How to Use a Wet Tile Saw: A Beginner’s Basic Guide

If you are looking to redo your bathroom shower or tub surround, your kitchen backsplash, or even a laundry room floor, you are likely considering tile. As you’re likely aware, tile is a fantastic material to use for heavy-traffic, heavy-use, and watery areas. It can be an intimidating process if you’ve never attempted it before, so here is a beginner’s basic guide to using a tile wet saw. A tile wet saw is simple, fast, and the most efficient tool for tiling in general that’s out there. (Also, for more info, check out our tutorials for tiling a kitchen subway tile backsplash and tiling a shower/tub surround.)
 View in gallery
 View in gallery
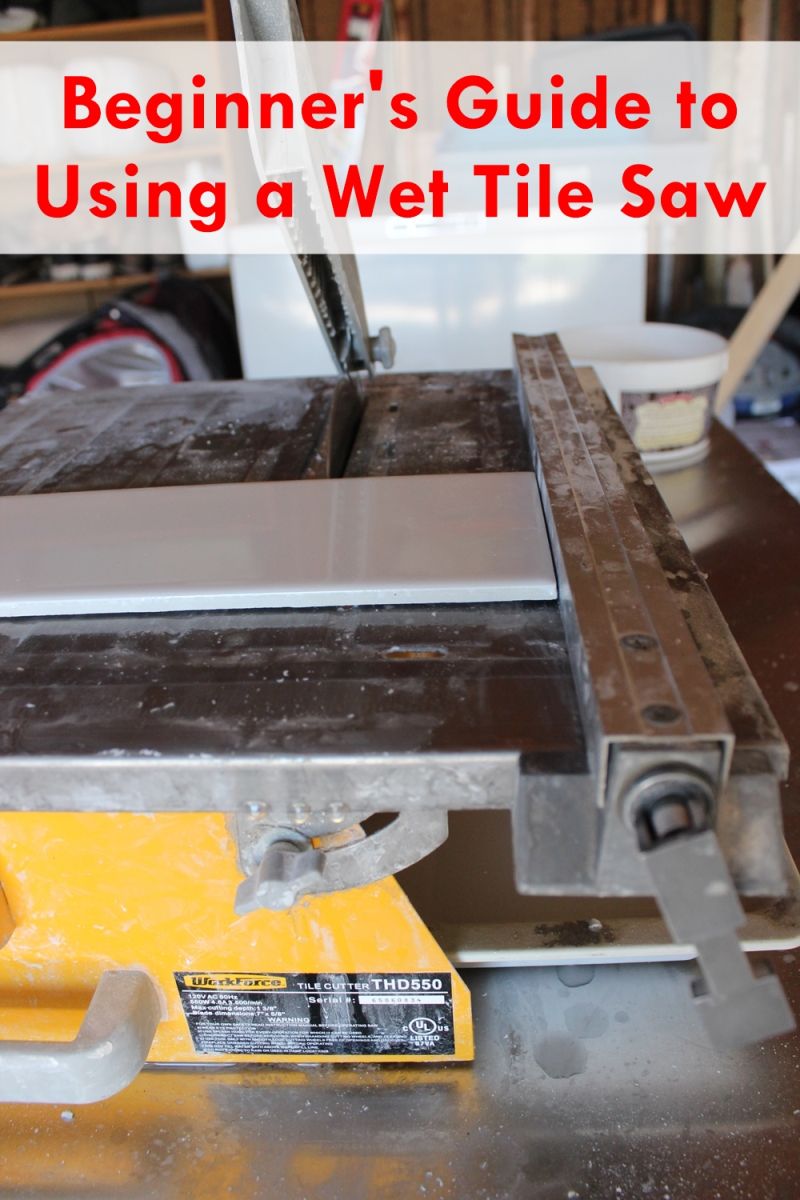
To begin, let’s look at the wet tile saw itself. The wet tile saw used in this guide is a small tabletop number. Familiarize yourself with the components; these are the names of parts we’ll use in this guide.
 View in gallery
The lock plate can be moved from side to side to enable you to cut your tile to any distance (as long as it fits on your saw table). There is a locking mechanism that’s similar to what’s used in raising and lowering a bicycle seat – pull the lever (lock) out to unlock, adjust the lock plate, and push the lock back in.
 View in gallery
After you measure the desired length of your tile, use the measuring guides on your saw table to lock the lock plate for your tile cut. These guides are located at the front and back edges of your saw table. Note: As you go along on your project, the measurement numbers will get covered with water and tile dust, so you’ll probably have to wipe them off regularly to be able to see them. Be precise with these measurements for a cleaner, more professional tile job’s outcome.
 locked lock plate" width="800" height="1200" />View in gallery
Position your tile snug against the measured and locked lock plate. Note: You can lock it in on either the right or left side of your blade, depending on the cut and what is comfortable for you. The on/off switch is typically located on the front of your wet tile saw.
 View in gallery
Holding both ends securely while double-(triple-?)checking your measurements, push down the locking lever.
 lock plate secured" width="800" height="533" />View in gallery
With your lock plate secured, your tile in place, your blade guard lowered, you’re ready to cut the tile. Switch on your tile saw.
 View in gallery
Using two hands when possible (only one is shown in these photos because I needed one hand to take the photos), push the tile downward onto the saw table, inward toward the lock plate, and backward (away from you) through the saw blade. Do this simultaneously and with equal pressure in all directions.
 View in gallery
Note: For some cuts, it’s not safe to use two hands because the distance between the spinning blade and lock plate is too narrow. DO NOT USE YOUR FINGERS HERE. Instead, use a long (2’-3’) piece of scrap wood or trim or another tile to serve as your fingers to push that section through the saw blade. This is so important. When this happens, use your other hand to be particularly careful to keep the tile pushed down snug and flat on the saw table; the tiles will have a tendency to want to rise.
 View in gallery
Continue pushing with your hand(s) and/or your scrap wood, equal speeds and pressures, until the tile is completely cut.
 amazing tile transformation project" width="800" height="524" />View in gallery
Congratulations, you’ve just cut your first piece of tile for an amazing tile transformation project. If the tile remnant, touching the lock plate, doesn’t come out as easily for some reason (this doesn’t happen often, but in case it does), just leave it there momentarily while you turn off your tile saw.
 View in gallery
When the blade stops spinning, lift your blade guard. Note: If you lift the blade guard while the saw is still on, this is not only dangerous, but it will also spray dirty tile-water all over your face and clothes.
 blade completely stopped" width="800" height="647" />View in gallery
With the tile saw turned off and blade completely stopped, it is now safe to reach in and pull out any tile remnants.
 View in gallery
Now that you understand the basic method of using a tile wet saw to make your tile cuts, let’s look at some of the techniques you might need should your tiling job get fancy. For example, an L-shaped tile might be required when tiling around a window or a cabinet…or anything else that doesn’t follow your tile line.
 View in gallery
Make your measurements, either writing them down somewhere or drawing directly onto the tile itself (whatever you’re more comfortable with given your space constraints). Choose one cut to make and set your lock plate accordingly. Cut only until the blade reaches the second (intersecting) measurement of your perpendicular line. Note: To do this, you may need to stand to the side of your tile saw, slightly lift the blade guard, and carefully push your tile through while watching from the side until the blade meets the line. Photos of this technique will be shown a little later.
 cut made precisely" width="800" height="533" />View in gallery
With your first cut made precisely, turn off your tile saw. Remove your tile carefully, keeping in mind that any tile that has been cut has a compromised (weakened) strength and can crack or break much more readily than a full tile. Find your other line to make your L-shaped tile and lay your tile in place in front of the blade.
 View in gallery
Measure then lock your lock plate into place accordingly.
 View in gallery
Lower your blade guard.
 View in gallery
Turn on the tile saw and cut slowly. As you push an already-cut tile through, pay attention to pressure points. In this case, if I were to push too hard on the narrow part of the cut tile while moving it through the blade, the tile would have a high likelihood of snapping. Instead, use caution and choose the strongest parts of your tile to move it through the blade; in this case, the back (thicker) half of the cut part. (And also a scrap wood on the narrow strip on the left.)
 View in gallery
As you approach the intersecting line, you’ll want to get a precise, 90-degree corner. Step slightly to the side of your tile saw and raise the glade guard about an inch. (The tile broke off here before the cut was complete, so I still needed to complete the cut to create a sharp 90-degree corner.)
 View in gallery
Continue pushing the tile through, slowly, until the blade meets your first line on the top surface of your tile. Note: To take this photo, the saw was turned off and the blade was not spinning. This would be a terrible place for one’s thumb if the saw were actually moving. SAFETY FIRST.
 View in gallery
You’ll be watching from the side so you don’t get sprayed in the face with water, impeding your vision for a clean cut.
 View in gallery
The corner is now square, but there’s now a bump created by the first cut’s not coming down far enough. If this happens to you, it’s completely fixable.
 View in gallery
Simply pull out your tile, line the blade up on the other cut, and shave it off.
 View in gallery
You might notice the back of the tile at this point. Because of the blade’s arc, the cuts will extend further on the tile’s back than on the front. This is one reason why it’s important to always use a tile wet saw with your tile facing upward.
 View in gallery
The front of the tile looks great. Well, good enough. J
 View in gallery
Take your now-L-shaped tile into your space and marvel at its flawless fit. Nicely done!
 View in gallery
So, we’ve covered basic cuts and L-shaped (or multiple-cut) cuts. Another tricky cut you might run into, particularly in a shower/tub surround, is the circle cut. Obviously, it isn’t possible to cut a circle with a straight saw blade. But you can use that same straight saw blade to create a circle cut. Here’s how. First, measure exactly (and I mean exactly) how big/small you need your circle to be. Draw it with a pencil or permanent marker onto your tile. This particular circle will be cut for the tub mixer valve.
 View in gallery
Start making narrow, parallel cuts with your saw blade up to your drawn line. The narrow strips of tile might break off as you’re sawing, and that’s fine, but don’t worry about it if they don’t break.
 View in gallery
When you’ve finished the complete arc, use tile nippers to snip off the narrow bits up to your drawn line.
 View in gallery
You have the advantage here of being able to angle your nippers to follow, pretty closely, your drawn line exactly.
 View in gallery
You’ll notice that the thinner your saw cuts are, the easier it is to break off the strips accurately. But there’s a tradeoff, because doing so many saw cuts takes more time as well. I’d recommend keeping your strips to about ¼” wide, if possible.
 View in gallery
When all is said and done, you should have a beautifully rounded cut. And to think you accomplished this with just a straight saw blade and some nippers!
View in gallery
Here’s the fit. Perfect!
We hope you’ve found this basic beginner’s guide to using a tile wet saw helpful. Good luck on your projects!
Note: The author is an experienced, although not professional, DIYer. Neither the author nor Homedit is responsible for any injury or damage that may be a result of following this tutorial.


Comments
Post a Comment